More Involved Internal Trigger
by Michael Beatnik
The crossmember is height adjustable for proper head-trigger contact. The piezo is better isolated from the crossmember to help prevent crosstalk.
You will probably have to improvise somewhat for your particular make of drums. Hopefully there is enough info here for you to get started.
 Parts Needed:
1. Piezo and cone from you know who?
2. 1″x1″x1/8″ thickness u-channel (crossmember)
3. 2″x1/8″ thickness aluminum plate (piezo standoff)
4. 3″x3/4″ corner braces
5. 1/4″ longer screws to replace lug screws and allow for thickness of corner braces.6. 8 bonded sealing washers (rubber on one side) to fit lug screws.
7. 4 screws to mount crossmember to braces (length will vary for your application) with washers, 8 nylock nuts and 4 regular nuts.
8. 2 rubber expansion nuts with screws and washers (these may be tough to find, luckily I found them at a well stocked family hardware store which is also tough to find. If I come across a supplier I will post them). Also known as Well Nuts or Rubber-Threaded Inserts.
9. 1/4″ plug and cable (mono for toms stereo for snare) 10. Plastic hole plug to fit vent hole. And don’t forget your mesh heads!
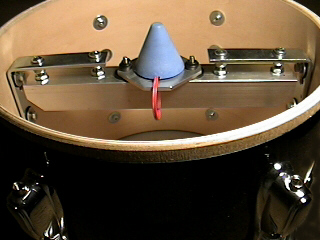 1.Start off by drilling the corner braces to match the holes for the toms lugs and mount these braces in the tom using the bonded sealing washers and the longer lug screws sandwitching the corner braces between the rubber sides of the washers.
2.Cut the crossmember to fit inside the tom making sure it is short enough to clear the lugs bolt heads.
3.Drill the crossmember to match the corner braces, I drilled these a bit oversized to alow for adjustment
when making sure the cone is on center.
4.Next you need to make your trigger standoffs from the aluminum plate being sure to drill it for the expansion nuts.
5.Find center on the crossmember and mark for the two holes you will drill for the standoff (aluminum plate) screws (center is critical).
6.Mount the piezo and cone directly in the center of the standoff (remmember center is critical). Mount the standoff assembly to the crossmember using the rubber expansion nuts (these serve to isolate the trigger from crosstalk).
7.Put screws washers and nylock nuts on
the coner braces snug but not tight. Add the regular
nuts and washers next and then the Crossmember
assembly followed by nylock nuts.
8.Adjust the regular nuts so the cone will just touch the head (1/32″ to 1/16″ above the bearing edge of the drum) and tighten the whole assembly. Check to be sure the cone measures to be at the center and adjust as neccesary.
9.Don’t forget to solder the cable and 1/4″ jack to the piezo leads running the cable through the toms vent hole. I used the plastic hole plug drilled to fit the cable for a snug fit.
*If you decide to convert a snare you will need to use regular washers in place of the bonded washers and mount your second piezo directly to the corner brace close to the shell. Don’t forget to use a stereo plug in this situation.

Thanx Michael for this excellent design!Best.
